| Free Patterns |
|
|
Sale Patterns |

- Phlox Socks - the Robyn's Nest June Sock Club
Pattern will be for sale as of October 1 2008
(You can email me or leave a comment and I will notify you when the pattern is available.)
|
| I Want to Knit |
|
|
|
| Tuesday, September 23, 2008 |
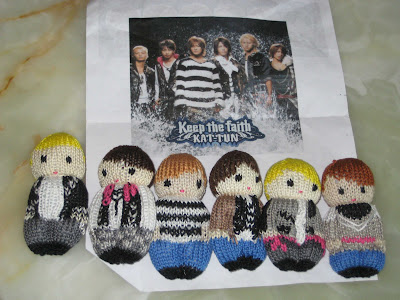
| kat-tun |
You people are good!  I can't believe it was guessed! And by two of you, no less! Good job! Yes, I actually knit a Japanese "boy band". During Secret Pal 12, my pal posted the following photo, with the explanation that it was a band she loved and she wished she could go see playing (they were in Japan at the time).
 Seeing those cute little cartoony figures reminded me of the Pocket Pal I'd knit for Jakob a loooong time ago (Ravelry link), and I had a brain-wave. I'd knit her her very own boy band! Seeing those cute little cartoony figures reminded me of the Pocket Pal I'd knit for Jakob a loooong time ago (Ravelry link), and I had a brain-wave. I'd knit her her very own boy band!
I used the basic shape of the Pocket Pal design, and changed the colors/clothing to reflect the cartoon figures.
All the KAT-TUN members were knit with scraps of Anchor and DMC embroidery floss, and on size 2.5mm needles.
If I knit more Pocket Pals with floss I would go down to a 2.25mm or even a 2mm needle, as I found them a little loose when stuffing. However, I think my next batch would be with worsted weight yarn, to have larger toys for my kids to play with.
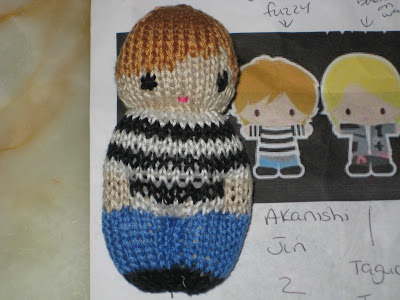 AKANISHI JIN He was the first one I completed, and I realized belatedly that he should have long sleeves, and not short sleeves, as I accidentally knit.
 NAKAMARU YUICHI NAKAMARU YUICHIYou can barely tell, but I actually knit his pants in fair isle to get the plaid effect of the original.
 TANAKA KOKI TANAKA KOKIIf I were to change the pattern, I would only work 2 rows of the white shirt, instead of 4. I find it wider than the illustration and it bugs me. You can't see it in this photo, but I actually used silver floss for the chain hanging around his waist.
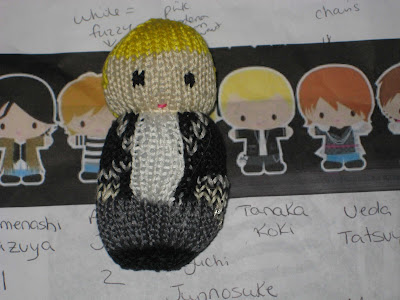
 KAMENASHI KAZUYA KAMENASHI KAZUYAI had fun with this one, although his hair left much to be desired. If you look closely, you can even see the fringe I embroidered below his leather jacket!
 TAGUCHI JUNNOSUKE TAGUCHI JUNNOSUKEI should have stuffed this one more, but misjudged how much I would actually need. Luckily he's so busy with his funky jacket and pink waist-scarf, that you can barely tell. UEDA TATSUYA UEDA TATSUYA I struggled with how to include the gauzy over-shirt this guy is wearing, but in the end I decided to omit it. My photo doesn't show it, but I did include the white patches on each shoulder.  Here's the back view of the 6. Please ignore the jog on the black & white striped shirt! Here's the back view of the 6. Please ignore the jog on the black & white striped shirt!
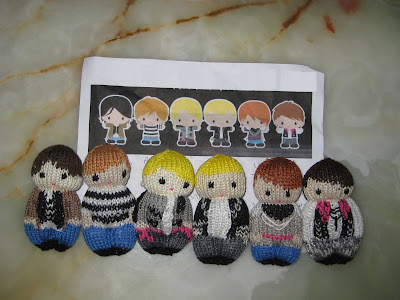
Here's the group shot with all 6 lined up in front of their respective cartoon icons. I am very pleased with how they turned out, but they weren't for me, after all...
Want to know what my secret pal thought? To see her reaction, and the cute box I sent them in, click here.
Labels: Akanishi Jin, FO, Kamenashi Kazuya, KAT-TUN, my patterns, Nakamaru Yuichi, Pocket Pals, secret pal 12, Taguchi Junnosuke, Tanaka Koki, Ueda Tatsuya |
posted by Jennifer Lori @ 7:50 am   |
|
|
|
| Thursday, September 04, 2008 |
| Hanukah Dreidel Pillow, part 6 |
The finished pillow! Yay!
After finishing the front, I cast on for the back. The back was worked in 2 overlapping sections so that the pillow could come out easily for laundering/changing of the cover. My original intent was to leave it as is, but once seamed, the center of the back kept gaping, so I added a row of buttons. Had I had more time, and a proper plan in place, I might have sewn down a strip of Velcro instead.
 When it came time to join the front to the back I had been planning on working icord but since speed was still a factor (I had to mail it to Mary Maxim before the contest deadline) I chose the easiest and fastest way for me- single crochet. For fun I decided to use white around the blue areas, and blue around the white areas. When it came time to join the front to the back I had been planning on working icord but since speed was still a factor (I had to mail it to Mary Maxim before the contest deadline) I chose the easiest and fastest way for me- single crochet. For fun I decided to use white around the blue areas, and blue around the white areas.
 And there you have it. One completed Hanukah Dreidel Pillow. Not a contest winner, but makes me proud enough to see it come out of my head and land on my couch. And there you have it. One completed Hanukah Dreidel Pillow. Not a contest winner, but makes me proud enough to see it come out of my head and land on my couch.
Labels: FO, Hanukah Dreidel Pillow, my patterns |
| posted by Jennifer Lori @ 7:41 am |
|
|
|
| Thursday, August 28, 2008 |
| Hanukah Dreidel Pillow, part 5 |
We're almost there!
The next step was to use more Patons Brilliant, this time in a shiny gold color, to duplicate-stitch the dreidel game letters in the four corners of the pillow.
 Another closeup for you! Another closeup for you!
 I know I said this before, but it continued to amaze me how much the finished product looked like my original sketch and computer design. I know it *should* look like what I wanted, but to see such an accurate representation tickled me every time I'd lay them side-by-side. I know I said this before, but it continued to amaze me how much the finished product looked like my original sketch and computer design. I know it *should* look like what I wanted, but to see such an accurate representation tickled me every time I'd lay them side-by-side.
Almost done now...
Labels: FO, Hanukah Dreidel Pillow, my patterns, WIP |
| posted by Jennifer Lori @ 9:30 pm |
|
|
|
| Wednesday, August 27, 2008 |
| Hanukah Dreidel Pillow, part 4 |
We're getting there, folks. Won't be long now!
Once the white "ridges" were complete, I did the letters on the dreidel itself.
 Another closeup. While the white ridges were done using the same yarn as for the background (Patons Shetland Chunky), the lettering was done using Patons Brilliant, a thinner, stiffer, metallic yarn. Another closeup. While the white ridges were done using the same yarn as for the background (Patons Shetland Chunky), the lettering was done using Patons Brilliant, a thinner, stiffer, metallic yarn.
 Because this was a contest submission we had to use yarns from the contest sponsors, including Patons, Bernat, Diamond and Kertzer. Because this was a contest submission we had to use yarns from the contest sponsors, including Patons, Bernat, Diamond and Kertzer.
I know I'm teasing this out instead of just showing a finished object and being done with it. Sorry to do that, but I can't show you what I'm actually working on as I am busy swatching for a few submissions I'd like to put out.
Labels: FO, Hanukah Dreidel Pillow, my patterns, WIP |
| posted by Jennifer Lori @ 7:52 am |
|
|
|
| Saturday, August 23, 2008 |
| Hanukah Dreidel Pillow, part 2 |
The next step for the Hanukah Dreidel Pillow was to do the shading on the dreidel itself. I used a dark orange shade and duplicate-stitched over the gold.
 In case you were wondering, I deliberately stuck with a white, blue and gold color theme. The Israeli flag's colors are blue and white, and I felt like the gold was a nice holiday addition. I didn't want to mix in too many other colors. In case you were wondering, I deliberately stuck with a white, blue and gold color theme. The Israeli flag's colors are blue and white, and I felt like the gold was a nice holiday addition. I didn't want to mix in too many other colors.
 Here's the closeup at this stage. There were one or two spots where I had to go back over a stitch a second time to get good coverage, but you really can't tell. Here's the closeup at this stage. There were one or two spots where I had to go back over a stitch a second time to get good coverage, but you really can't tell.
More coming soon!
Labels: FO, Hanukah Dreidel Pillow, my patterns, WIP |
| posted by Jennifer Lori @ 9:00 am |
|
|
|
| Wednesday, August 20, 2008 |
| Hanukah Dreidel Pillow, part 1 |
A few days ago I received my Hanukah Dreidel Pillow back in the mail. That was the entry I had submitted to the Mary Maxim design contest. Since I didn't win or place, the rights to the pattern stay with me, which means I can share it with you.
I decided to share a bit of my thoughs and my process on this pattern. I had a really hard time with the design. It wasn't coming up with an idea- I knew I was entering the "Knit or Crochet - Holiday Craft" section of the contest. I had a TON of ideas that I really, really liked. The problem? I really, really liked them.
See, I didn't realize until after I'd sent in my entry fee that were I to win or place, Mary Maxim would get the rights to the pattern. That means that if they were honorable, my name would appear somewhere on it as the actual designer...but other than the contest prize, I wouldn't get anything for the pattern, regardless of how popular it might prove to be.
This made designing tough- I wanted to submit something I was proud of, but at the same time I wanted to keep any "really good" ideas to myself, so if I were ever to knit them, I would get to keep the rights to them.
I knew I wanted to design something Hanukah-related. The majority of the holiday crafts in Mary Maxim are Christmas-themed (which may in part explain why I didn't place, lol) and I wanted to do something to help celebrate another religion. In the end I had the idea to work up a pillow cover with a dreidel on it.
My first step was to swatch. The navy yarn is Patons Shetland Chunky. (If you remember this post, you'll remember when I bought all the yarns I had considered using).
 Once I had my gauge calculated, I started testing some duplicate stitch and embroidery. I had originally planned on having some lettering on the pillow, and I wasn't sure which method would have provided better results. The yellow yarn used for the embroidery was more Shetland Chunky, and the red one is Patons Brilliant. Once I had my gauge calculated, I started testing some duplicate stitch and embroidery. I had originally planned on having some lettering on the pillow, and I wasn't sure which method would have provided better results. The yellow yarn used for the embroidery was more Shetland Chunky, and the red one is Patons Brilliant.
The pillow cover was worked in 3 sections (the front, and the 2 back halfs) that were seamed at the end. Here is a photo of the front in progress. The design for the front had a white background with a navy block in each corner.
 Once I had my gauge worked out I was able to properly plan the design. I printed off some knitters graph paper to my specific gauge (I like the template here) and started sketching. Once I had my gauge worked out I was able to properly plan the design. I printed off some knitters graph paper to my specific gauge (I like the template here) and started sketching.
I had an outline done by hand then switched to the computer to chart it out in Excel. I didn't care if my Excel chart was to scale, because I already knew that my drawing was to scale. (In other words, if my knitter's graph paper drawing to scale had the corner boxes be 30 sts by 40 rows, then I would color in 30 boxes by 40 boxes in my Excel spreadsheet, etc.) I didn't want to complicate my life by having too many dangling ends, so I broke the pattern down into sections. The background (white and navy) and the main dreidel color (gold) were knit using intarsia to have one flat background. Everything else in the image would be done in duplicate stitch. I forgot to take a photo of the original, plain background, but here you can see it after the first round of duplicate stitch. Just like in cross stitch, where you work a section of one color before switching to another, I did my pattern in layers. Also, knowing how duplicate stitch actually builds up the layers of fabric, I worked in order from the most recessed to the most forwards. So my plan was to start with the background shading, then do the dreidel shading, and last do the letters.
In this image you can see my printed Excel chart and the pillow front with the black shading done around the right and lower edges of the dreidel. (In the chart, the completed shadow sections are highighted in pink, but you can barely see it).  Here's a closeup. The duplicate stitch came out pretty even and had good coverage- that was what I was afraid of most, that the gold would show through. (Luckily, in planing ahead, I knew that other than the letters, I was working darker colors over light). Here's a closeup. The duplicate stitch came out pretty even and had good coverage- that was what I was afraid of most, that the gold would show through. (Luckily, in planing ahead, I knew that other than the letters, I was working darker colors over light).
 I learned that I like my duplicate stitch better when I work from top to bottom, either in rows or columns. I'm not as crazy about the result when I tested it from bottom to top. I found that working top-down causes the stitches below the ones completed to close up any gaps, whereas when you work bottom-up you need to pierce the center of the stitch you just did then move away, possibly separating the stitch and allowing the base color to show through. I learned that I like my duplicate stitch better when I work from top to bottom, either in rows or columns. I'm not as crazy about the result when I tested it from bottom to top. I found that working top-down causes the stitches below the ones completed to close up any gaps, whereas when you work bottom-up you need to pierce the center of the stitch you just did then move away, possibly separating the stitch and allowing the base color to show through.
Coming soon - more on the Hanukah Dreidel Pillow...Labels: FO, Hanukah Dreidel Pillow, my patterns, WIP |
| posted by Jennifer Lori @ 7:46 pm |
|
|
|
| Thursday, June 05, 2008 |
| looooong weekend |
I know, it's almost next weekend. But I finally have a chance to tell you about last weekend, so here goes. Ignore the fact that the date on this post is about 2 days behind the day you're actually reading this, I've been trying to get this post up for a while now.
So, where was I? Oh yeah, last weekend. I worked on Saturday, then spent the night working on the June sock and baking a cake. We were having a birthday party to celebrate Jakob's first birthday with our family, and I wanted to bake a healthy birthday cake to counter all the sweets my mom would be preparing.
I baked the cake Saturday night so it would have time to cool overnight, and Sunday morning when we got back from Jakob's swimming lessons, I iced it:

His party "theme" was Superman, and I really wanted to put a big "S" shield on the cake, but no matter how hard I tried I couldn't get the white icing tinted a vivid red, blue or yellow. The closest I got was cornflower blue, pepto pink and a pale yellow. So I moved on to option "B":

There's a local kitchen store who will take a photograph and print it (in edible dyes) on a thinner-than-paper sheet of edible icing. In this photo my printout of the image I made on the computer is on the left, and the icing photo is on the right. Not bad eh? It's not as creative as icing it myself, but I'm happy with how it looks, and it only cost $12.95 for the icing sheet. It took 10 minutes of waiting at the store, which makes this a great option for a last-minute event.
 And here's how it turned out. The cake was cold from the fridge so the icing sheet didn't melt into it, and I did have to cut away one side to be able to put his "1" candle in, but all in all, I think his first birthday cake came out ok. I would have rather have done some really cool decoration myself, but it didn't work out. And here's how it turned out. The cake was cold from the fridge so the icing sheet didn't melt into it, and I did have to cut away one side to be able to put his "1" candle in, but all in all, I think his first birthday cake came out ok. I would have rather have done some really cool decoration myself, but it didn't work out.
Here he is, about to dig in...

...and enjoying his first slice. He spent a good 15 minutes licking up every drop of icing before working his way to the cake.

Here's a photo of Jakob and me. I think this was the only time I actually got to hold him the entire party- between the family who rarely sees him and the family who always sees him, he was a very "in demand" baby!

A photo of the bubbies... from left: Sean (Robyn's son), Carol (Robyn's and Amy's mom and my aunt), Jakob, my mom, Marlene (our cousin) and Oliver (also our cousin). Carol is my dad's sister, and Marlene is my grandfather's sister's daughter.

(The last 5 photos were stolen with permission from Amy's blog). On Monday I finished the June socks. It felt good to cross something off my deadline list. I photographed them, finalized the pattern and sent it off to Robyn to include in her kits. So if you've ordered a Robyn's Nest June Sock Club kit, they're gonna be coming soon!
One project down, and on to the next. I'm designing 2 projects for the Mary Maxim 2008 contest. I hadn't realized until after I'd sent in my entry fee that they get the sole distribution and publication rights to any winning patterns. I'm not thrilled about that, but I will be sending something in anyways. The pattern DOES keep my name as designer, and it can't hurt to get my name out there.
Here's my first swatch.
 Don't try and read it- that was just some test duplicate stitch to see what worked best. Also, don't try and guess what it is...you won't. Seriously. Don't try and read it- that was just some test duplicate stitch to see what worked best. Also, don't try and guess what it is...you won't. Seriously.
 This is the wip as of a few days ago. The yarn is Patons Shetland Chunky, in white and navy blue. This is the wip as of a few days ago. The yarn is Patons Shetland Chunky, in white and navy blue.
I'll leave you with one of my favorite photos lately. 
Labels: my patterns, my published patterns |
| posted by Jennifer Lori @ 7:27 am |
|
|
|
| Saturday, May 24, 2008 |
| secret stuff |
Argh. It's tough when there's stuff going on (p.s. I almost typed "it's tuff when there's stuff...") and I can't blog about it.
I've been knitting like mad every night. As I've mentioned previously, I'm designing the sock for Robyn's Robyn's Nest June Sock Club Kit (that's a mouthful!) and seeing as how it's sold out twice, I'm trying very hard to have a sock that people will like.
I've finished designing the sock itself, and am in the process of typing up the pattern. I will then be knitting up a second sock following the pattern only, and choosing a different size than my first sample. This way I'm trying to test-knit my own pattern. The only downside to all this is that I can't show you progress photos or even the yarn itself. But trust me- the yarn is beautiful, and I hope the sock is good too. :)
Once the sock is done I will have to rush like mad to design and knit my Mary Maxim contest submissions, since they have to arrive by mail in Ontario no later than June 20th. In other words, I've got less than 1 month to design them, knit them and mail them off, plus allow time for shipping. But no pressure, right?
Can you believe I'd actually thought I could squeeze 2 dinosaurs into this schedule? *snort*
On a slightly unrelated note- I've just signed up for Secret Pal 12. I haven't done a secret pal exchange since they were at number 6 or so, so I'm looking forwards to this one.
Oh- and Pete Grimaldi of Skin MD Natural wants me to let you all know that the free samples (like the one I reviewed) are still available, so if you have a blog and want some free skincare to try out, head over to their website! (The links are in my last post).Labels: my patterns, my published patterns, secret pal 12 |
| posted by Jennifer Lori @ 9:28 am |
|
|
|
| Sunday, May 11, 2008 |
| happy mother's day! |
To start this post off, let me wish a huge HAPPY MOTHER'S DAY! to all the moms, grandmothers, mothers-to-be, foster mothers, and anyone else who raises, takes care of or in any way helps shape the life of a child. We rock!
Here's Mommy with Jakob at 50 weeks (not this past week's photo, but the one before).
 I still haven't uploaded the photos from my camera from last week, and my head is still in a fog. Sorry! I still haven't uploaded the photos from my camera from last week, and my head is still in a fog. Sorry!
I have been knitting like mad, but can't show any of it. See, I'm designing the sock for Robyn's Robyn's Nest June Sock Club Kit, and while it is going very well, it is a surprise. I still like my original design, but I came to realize that while many people might say "hey- that's cool", very few would actually want to knit it...or at least they'd want to knit it, but it wouldn't be the kind of sock they'd want to wear. So I pored over my design books and was inspired by a little stitch pattern in a book by someone you might have heard of. Barbara Walker? Anyone? Anyone? Bueller? I've been crunching more numbers than food this week, but things are starting to take shape, and I'm really pleased with the progress so far.
I can't believe the kit is almost sold out! No pressure, or anything... :)
I do have some knitting that I can share, however.
Here's the finished Marble Cabled Cardigan.
 I'm really happy with how it came out. I knit the 1-2 year old size, and since Jakob is slim, I'm sure he'll get to wear it even until next Fall. I'm really happy with how it came out. I knit the 1-2 year old size, and since Jakob is slim, I'm sure he'll get to wear it even until next Fall.
 Yannick chose the pattern when I told him I wanted to knit something with this particular Marble colorway. He also chose the buttons. Yannick chose the pattern when I told him I wanted to knit something with this particular Marble colorway. He also chose the buttons.
 They are adorable, but a little heavy for the light sweater. I might have to change them. They are adorable, but a little heavy for the light sweater. I might have to change them.
Details: (from memory- so forgive any mistakes) The pattern is a pamphlet designed for the actual yarn. Needles are downstairs but I think I used a 4mm for the body and 3.25 for the ribbing. Modifications: I reversed the cable on one side of the band so they would mirror each other instead of both leaning in the same direction. I didn't do the hood, and did a simple ribbed collar instead. I did a one-row buttonhole instead of binding off in one row and casting on in the next. I'm pretty sure there was something else I changed but I don't remember now.
Here's a photo I've been wanting to take for almost a year.  Isn't that cute??? I'd taken a photo of Yannick's Mega Sock (Mega Boots Stretch yarn) next to the baby version I made for Jakob, but I always wanted to get a photo of my two boys IN their matching sock. I finally got one, and I LOVE this photo. Isn't that cute??? I'd taken a photo of Yannick's Mega Sock (Mega Boots Stretch yarn) next to the baby version I made for Jakob, but I always wanted to get a photo of my two boys IN their matching sock. I finally got one, and I LOVE this photo.
I leave you with a question...
My dad is trying to convince me to get these glasses for myself.

What does we thinks?  Does we likes? I really like the sides of the frame, and the side view. I'm scared to commit! Does we likes? I really like the sides of the frame, and the side view. I'm scared to commit!
 I think they're too wide from my eyeball to my temple, but I do have a large head, and frames that fit nicely around my eye have the frame's temple stretched sideways to go off to my ear. I think they're too wide from my eyeball to my temple, but I do have a large head, and frames that fit nicely around my eye have the frame's temple stretched sideways to go off to my ear.
 So? I've taken the lenses out of the frame since these photos were taken, so I can take photos without the glare or designer name on the lenses, if necessary. So? I've taken the lenses out of the frame since these photos were taken, so I can take photos without the glare or designer name on the lenses, if necessary.
Labels: baby Mega Socks, Cabled Hoodie, FO, Mega Boots Stretch Socks, my patterns, my published patterns |
| posted by Jennifer Lori @ 8:51 am |
|
|
|
| Tuesday, April 22, 2008 |
| go habs go |
Maaike and I are going to see the Yarn Harlot at WEBS this weekend, and decided to keep up the tradition of knitters bringing her washcloths. We worked up some ideas and I quickly designed a cloth for Montreal and a cloth for Quebec. As a final touch, I also came up with a Habs cloth (the Yarn Harlot is from Toronto...and the Habs are doing better than the Maple Leafs this year). These cloths were designed by me with help/inspiration by Maaike. I was going to wait to knit up a sample in all sizes before publishing, but in the spirit of last night's game 7 win by the Canadians, I'm going to offer a rough cut of the pattern here so you can get your Habs fever on, knitting-style! (about 4.5" x 6") (just like the small size but with more space around the logo, adding about an inch to all directions) (bigger than the others and has the words "GO HABS GO" across the top and bottom)  ETA1- I made a slight change to the pattern (added 2 rows in the red section below the C) for all sizes. The new files were uploaded and the links changed at 9:45am EST on April 23 2008. If you downloaded the files before that date please download the latest version. Thank you! ETA1- I made a slight change to the pattern (added 2 rows in the red section below the C) for all sizes. The new files were uploaded and the links changed at 9:45am EST on April 23 2008. If you downloaded the files before that date please download the latest version. Thank you!
ETA2- I am aware that there was a problem downloading the files earlier. I have fixed this with the hosting people, and there shouldn't be any more problems accessing the patterns. If you have any problems, please email me! Labels: dishcloths, my patterns |
| posted by Jennifer Lori @ 11:35 pm |
|
|
|
|
|