Sometimes a pattern will call for an invisible cast on. An invisible cast on is when you cast on with your yarn and a waste yarn (usually a smooth yarn like cotton in a contrasting color). The way you twist the yarns as you cast on will result in giving you the "backs" of the stitches to pick up later. This means that if you cast on 40 sts, you will have 40 sts ready with your working yarn to knit up right away, and then later when you unpick the waste yarn you will have 40 more sts waiting for you to slip on a needle and begin knitting in the other direction.
This can also be called a "provisional" cast on, and the directions can call for you to crochet a long chain and knit your first row into the back "bumps" of the chain. When you use this method the crocheted chain holds your first row "live" and you can "unzip" the crochet chain later and put the freed stitches back on the needle to knit in the other direction.
I've had to use this many times-
- my favorite toe-up sock pattern has you start with an invisible cast on, knit the toe section, then put the other half of the cast on sts on two more needles so you can start knitting the foot in the round.
- a gift scarf I knit once had you start with an invisible cast on, knit half of the funky cable pattern, bind off, then put the other half of the cast on sts on the needle so you could repeat the scarf for the other side, ensuring that both halves of the scarf were the same and knit in the same direction (instead of casting on at one end, knitting to the other end, then binding off).
- the Samantha baby sweater dress I had knit for my friend's daughter also has you cast on with an invisible cast on, work a picot edging, then later release the other half of the live cast on sts to hem them up by folding along a turning row and then sewing the hem in place.
It's that last one that led to my latest ah-ha! unvention. I had decided early on that I was too lazy to sew the bottom hem up later, when I could easily knit it in as I went. Instead of waiting until the piece was done, undoing the waste yarn, threading the long tail on a needle and sewing down each loop of live stitch, I would instead work the hem as directed, but once I'd worked to a point even with the length of the hem (for example 8 hem rows, turning row, 8 body rows) I would release the waste yarn sts to another needle and knit them together with the next body row. This works much as one would do a 3-needle bind off, except you don't bind off. You just knit a stitch from each needle together.
That worked perfectly, except for one thing: I hate picking out the waste yarn from when you do a typical cast on of this type. Because the only thing done in the waste yarn was to cast on there is only that bottom edge of a contrast, and it is not always easy to find the stitches of your first actual row. I always feel like I'm going to lose a stitch, especially the end ones.
So I came up with an easier idea. In my case I'm going to show you how to use it to knit in a hem, but you can skip the hem part and just use the technique to have your stitches ready to knit your ribbing or hem later if you're not sure what you want to do yet, or to knit in the other direction (like a scarf or shawl).
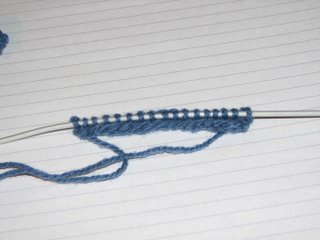
I still cast on with waste yarn, only this time I knit a row or so. Enough to give you a row of knit stitches that you can see easily.
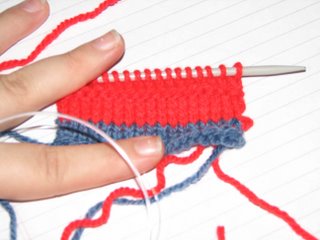
Then switch to your pattern yarn and work as you like until the point where you want to knit in the hem. (In this example, I think I'd knit 5 rows, purled a row as a turning row, then knit 5 more rows).
Many times I have been in the middle of a project when I notice an error that can't be corrected by dropping down just a few stitches. In these cases, instead of just ripping back I sometimes like to insert the needle into the knitting first, then rip. This way I can't rip too far, and all the sts end up sitting there on the needle for me. This works the same way.

Insert a second (slightly smaller) needle into one half of each of the sts in the first row of your pattern yarn. Make sure you have done this for all the sts (if your row has 32 sts make sure you pick up half each of 32 sts).
Cut the waste yarn in a few random spots in the first row. Make sure to not cut the pattern yarn!
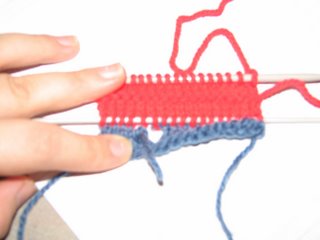
This shows the cut end starting to be unpicked from the knitting.

Use a needle or the points of your scissors to help you pick out the first row of waste yarn.
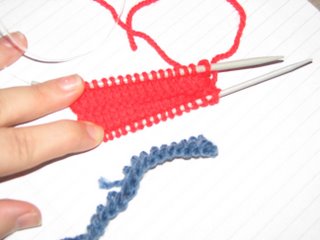
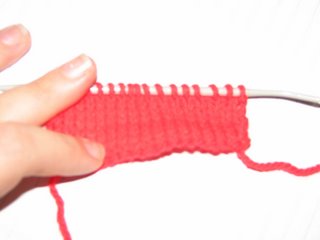
This leaves the pattern yarn sitting there on your needle, all the stitches looking pretty and ready to knit! This gives you the same result as the traditional invisible cast on, without the fiddly cast on itself and the trial-and-error I always experience when picking out the waste yarn.
And that's all there is to it! Now the cast on row is ready to do whatever you want. Again, in my case I have done it after some extra hem rows because I will be turning the hem and knitting it in, but you could easily have done this just at the beginning of your regular knitting pattern and then the stitches would be ready to knit your ribbings, lengthen your garment, knit in the other direction, graft something, or do whatever you like! I'm going to continue the directions for how to knit in the hem for those of you who would like to try this. 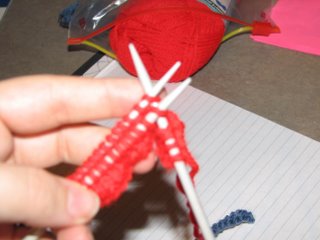
Then, to knit in the hem as I did, all you need to do is fold it up and knit a stitch from each needle together. Once that's done, you just keep knitting your pattern as usual.
This shows the front of the hemmed piece after the hem was knit in and I'd knit about 5 more rows. The turned edge is nice and flat because of the turning row (you can also use a picot edge or anything you like). The bottom is thicker and doubled with a nice, sturdy hem that will not unravel, and the two sides are open so you can insert an elastic if you like. If not then the sides will close when you seam the piece, or you can just seam them shut later.

This shows the back. You can see the stockinette section at the bottom which is the folded hem, and then the reverse stockinette section which is the back of the right-side stockinette part. It's neat and simple!
This method can be used in any instance where an invisible or provisional cast on is required.
I really got this idea because I have no problem picking up one side of each stitch when ripping back, and that helps me often. I thought, "wouldn't that be easier than picking out a cast on row and trying to find the sts?" For me, this was much easier, I didn't need directions on how to cast on, nor a crochet hook. Quick, simple and painless. Hope this helps someone like it did me! |


Neat technique! My knitting is much more simple than this at the moment, but I can see that it would be very useful. Thanks for sharing! (and the encouragement on my knitting projects) :)